MDID Curation
How is MDID Organized?
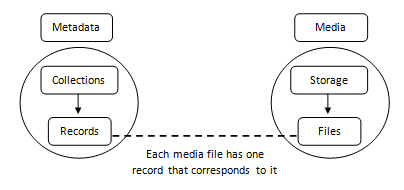
Everything in MDID is organized under two main sections: Metadata and Media.
Metadata
- Collections: All Records: in MDID are organized within a collection. Collections can also be organized within a larger collection group, if desired.
- Records: hold information about the collections.
Getting Started with MDID
Creating a New Collection & Editing an Existing Collection
- First, login to MDID with your username and password.
- After you log in, there will be a gray navigation bar above the MDID homepage. Click on the Management option in the navigation bar.
- On the next page, click on the Manage Collections link to begin creating or editing a collection.
- Before you begin to create a new collection, let’s take a quick look at how MDID organizes your collections. Collections are organized in alphabetical order by their title. Other basic information about the collection is located next to the Collection title. Under the Hidden column, you can see whether or not the collection is available to students. The next column, entitled Records, displays how many records are associated with that collection. In MDID3, users have the option to create larger collection groups. The Children column shows all the collections that are available within a specific collection group.
- Click on the Create a New Collection link on the top of the page.
- On this page, enter a Title for the collection and select whether or not to hide the collection. Enter a description for the collection in the Description field. Scroll down to the Children option. In MDID3, users have the option to create larger collection groups. You can create a collection group by selecting Children to add to the collection. This ensures that your collection group will house these specific collections. If you do not wish to create a collection group, then simply ignore the Children option.
- Finally, click the Create button to finish creating your collection.
- To edit a collection after you have created it, follow these steps: First, select** Management** in the gray navigation bar.
- Next, select the menuselection:Manage Collections link.
- On the next page, choose which collection you would like to edit and click on the Title of that collection.
- On the Edit Collection **page, make any necessary changes to the collection and then click **Update to save your data.
Modifying Permissions in a Collection
- When creating or editing a collection, you also have the option to modify Permissions for that collection. Permissions allow you to add other users to the collection and give them certain capabilities, such as the ability to Read the collection,** Write** the collection, and Manage the collection. placeholder; All Permissions options are located in the box on the right side of the **Edit Collection **page.
- To modify Permissions, click on the pencil icon next to the Permissions title. This will bring you to the **Modify Permissions **page.
- The first options available to you on the Modify Permissions page are the Read, Write, and Management options. Here is a brief description of each permission:
- Read: users can see the content, but cannot make any modifications to it.
- Write: users can edit the content. For example, users can modify the metadata or create/remove records.
- Management: users can do anything within the collection. For example, they have the ability to change permissions for others.
Importing Metadata (Records)
- The Metadata that you wish to upload should already be created in an Excel spreadsheet. The spreadsheet will be very simple:
(coming soon)
The first row contains headings for the individual data fields. The two required * fields are **Identifier * (which needs to match the file name) and Title. Other fields can be added as needed. Once the spreadsheet is created, save it as a CSV (Comma Separated Value) file by selecting File ‣ Save As and choosing **CSV (*.csv)** from the **Save as type** dropdown menu.
- In MDID, go to Management and click on the Import Data link.
- Select the Browse button and locate the CSV file on your computer.
- After you have selected the CSV file, click the Upload and Analyze File button to upload the file to MDID.
- After uploading the file, choose where to locate the metadata. The Source Field lists all the columns found in the spreadsheet.
- Use the Separate **option if you have typed in more than one title in the .csv file. For example, if you have typed in Title 1; Title 2, you must identify the separator, which in this case is the semi-colon (;), and select **Separate.
- After you have completed importing the data, MDID will take you to the Manage Jobs screen. On this screen the status of your data upload will display as Running, until the data has finished uploading. To be sure that your file has completely uploaded, select the **Refresh **button on your browser.
Manage Storage
- First, click on the **Management **link in the toolbar.
- On the next page, click on the Manage Storage icon.
- Click on the name of the collection/storage that you wish to edit.
- On the Edit Storage page, you can edit the Title of the
collection along with other options such as the Base, URL
Base, and Server Base.
- Base: this is the drive letter path to the files (i.e. d:/images/aict)
- URL Base: Andreas to fill in this definition
- Server Base: Andreas to fill in this definition
- When you have finished editing the storage, simply click on the **Submit Changes **button to save any changes that you have made.
Import Media Files
- Click on the Management link in the toolbar, then click on the Import Media Files icon. Note: all files must be associated with a record. If you import files without having matching metadata records, MDID will create a stub record automatically.
- On the Import Media Files page in the Collection dropdown menu, choose a collection that contains records that the media you are importing is associated with.
- In the Storage dropdown menu, select the storage location where the media files will be stored.
- Next, there are several options available to you. Each option along with a definition is listed below:
- Create Records: with this option, you have the ability to create the media files first and the program will automatically create a placeholder record that you can add and edit later. Therefore, you have the option to create the media files first if you desire.
- Personal Records: (coming soon)
- Replace Files of Same Type: if you check this option, you can replace one image but leave all other existing files.
- Allow Multiple Files of Same Type: this allows you to add more than one file of the same type to a record. In order to do this, you must add a suffix to the name (i.e. ABC001_01.jpg, ABC001_02.jpg, etc.)
Finally, click the Select and Upload Files button and choose the media files to upload from your computer.
Warning
do not navigate away from this page until the upload is complete
(Permissions available in storage as well – i.e. faculty get high res videos; students get low res videos - coming soon).
Additional Options in MDID3
Statistics, Permissions, and Delete Collection Boxes
- The next box, located directly below Related Pages, is the Statistics section. This section simply shows you how many records are contained within the collection.
- Below the Statistics **box is the **Permissions option. By clicking on the pencil icon to the right of Permissions, you can add or remove users or groups to a collection.
- To use the Effective Permissions box simply type in a username and click on the Calculate button to determine their permissions for the collection.
Advanced: Streaming Video (coming soon)
__republished from https://sites.jmu.edu/mdidhelp/532